从Spring事件的发布顺序说起
最近在解决一个有趣的issue时,利用到了Spring中生命周期事件的发布顺序。主要就是根据不同事件的发布顺序不同,在SpringBoot应用启动的某些阶段触发框架的动态优化逻辑,替换一些bean,并且替换后的bean也能正常监听后续阶段发布的事件并执行替换后的逻辑。
说起这些启动时的生命周期事件,我们都耳熟能详。在研究Spring刷新或者SpringBoot启动流程的源码时都能看到它们的身影,或者也监听过某些事件来实现一些业务逻辑。但是,对于整个的生命周期事件的分类、顺序等的逻辑我其实是一直比较模糊的,需要用到时才会去研究一番。故而,想借此机会来简单梳理一下这些事件,也加深对其背后所代表的应用启动流程原理的了解和理解。
有哪些事件
先来看看Spring(6.0.11)和SpringBoot(3.1.0)中到底有哪些生命周期相关的事件,这里是参照的较新的版本的文档和源码:
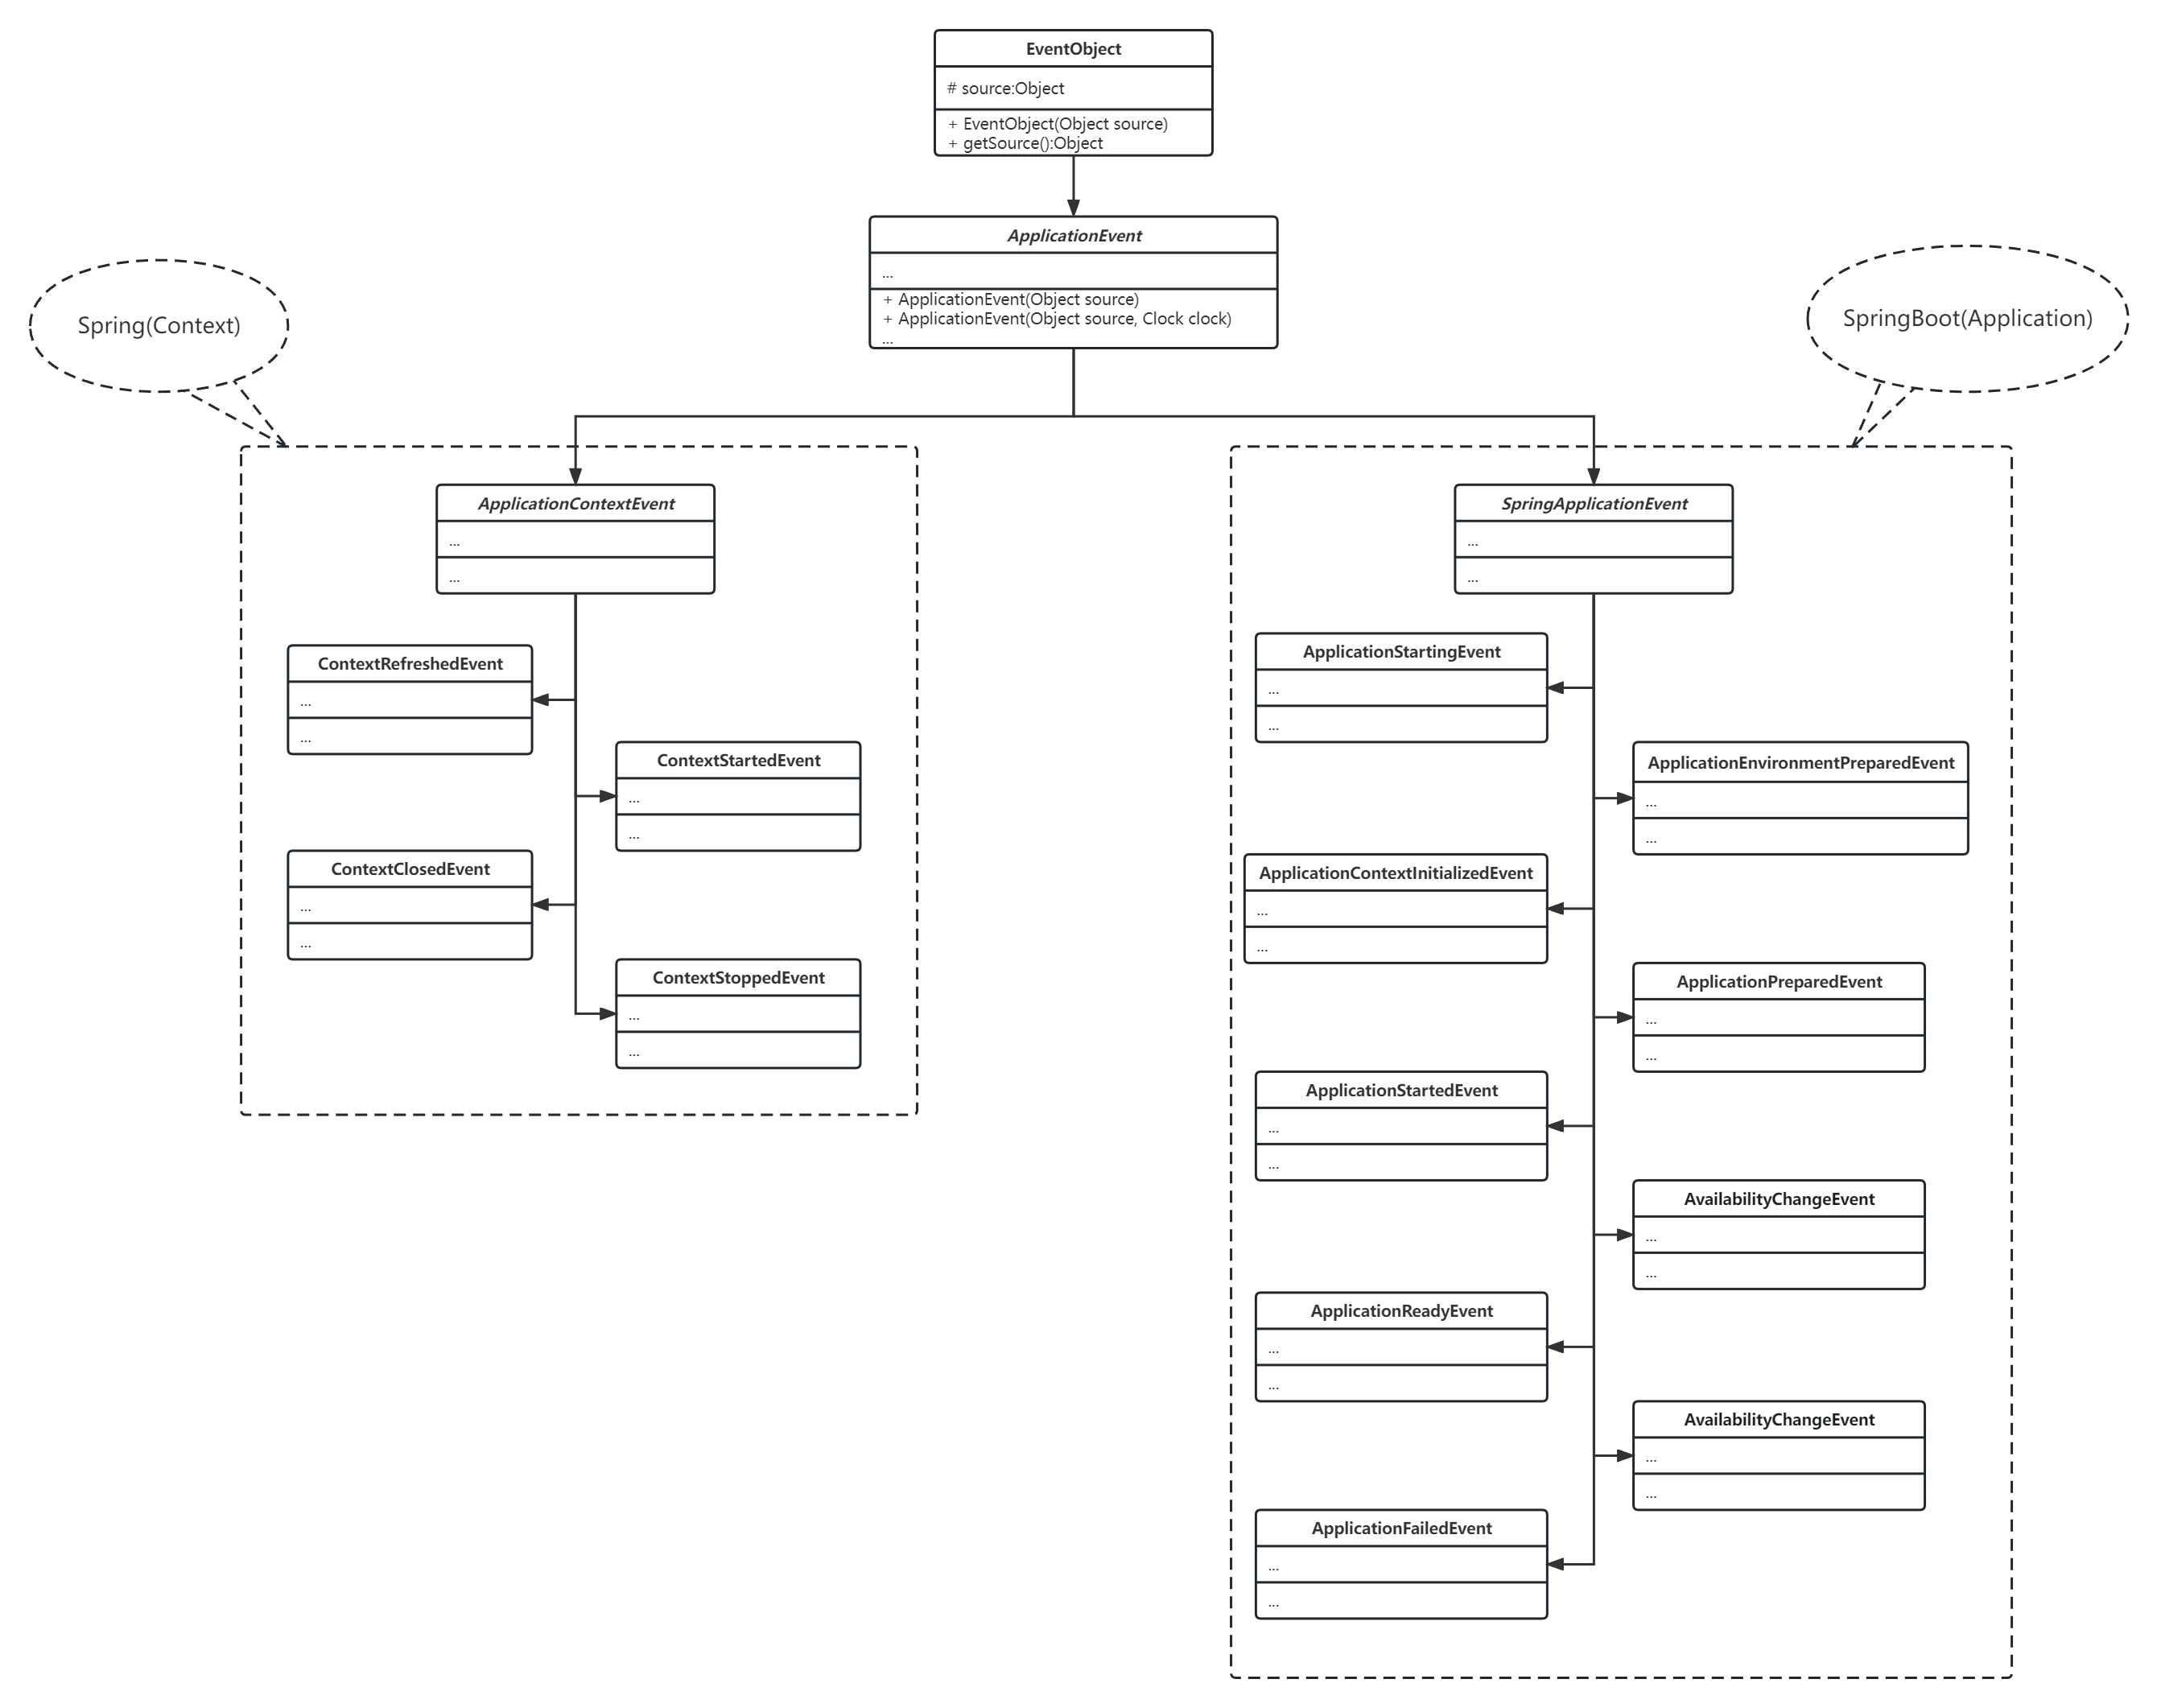
- EventObject:顶层父类为
java.util.EventObject,是基于Java的事件机制。 - ApplicationEvent: Spring的顶层抽象类,所有扩展的应用事件类都必须继承它。
接下来就是Spring和SpringBoot的不同实现,从事件名称也可以看出它们的侧重点不一样,也反应了二者(Spring和SpringBoot)的区别:Spring的核心是应用上下文(ApplicationContextEvent),而SpringBoot的侧重点则是应用本身(SpringApplicationEvent)。
先贴一下官方说明文档,再简单做一下说明:
- Spring的事件介绍文档:context-introduction
- SpringBoot的事件介绍文档:application-events-and-listeners
Spring#ContextRefreshedEvent
Published when the
ApplicationContextis initialized or refreshed.
Spring上下文初始化完毕或者刷新完毕,即Environment、BeanFactory、PostProcessor、MessageSource、Listener、Singletons等等都准备完毕之后,会发布此事件。
它也是绝大部分应用走Spring自动加载刷新流程时所关注的核心事件,后面的几个事件都不同于它。
Spring#ContextStartedEvent
Published when the
ApplicationContextis started by using thestart()method on theConfigurableApplicationContextinterface. Here, “started” means that allLifecyclebeans receive an explicit start signal.
文档中明确说明,是在显式的调用ConfigurableApplicationContext#start()方法后上下文启动完成时发布,所以一般我们正常的自动启动流程是监听不到此事件的。
Spring#ContextClosedEvent
Published when the
ApplicationContextis being closed by using theclose()method on theConfigurableApplicationContextinterface or via a JVM shutdown hook. Here, "closed" means that all singleton beans will be destroyed.
同上,对应上下文关闭的事件。
Spring#ContextStoppedEvent
Published when the
ApplicationContextis stopped by using thestop()method on theConfigurableApplicationContextinterface. Here, “stopped” means that allLifecyclebeans receive an explicit stop signal.
同上,对应上下文结束的事件。
SpringBoot#ApplicationStartingEvent
An
ApplicationStartingEventis sent at the start of a run but before any processing, except for the registration of listeners and initializers.
应用启动但未做任何处理(除了一些listener和initializer的注册)时会发送此事件。
SpringBoot#ApplicationEnvironmentPreparedEvent
An
ApplicationEnvironmentPreparedEventis sent when theEnvironmentto be used in the context is known but before the context is created.
环境已经准备完成但上下文还未创建时发送此事件。
SpringBoot#ApplicationContextInitializedEvent
An
ApplicationContextInitializedEventis sent when theApplicationContextis prepared and ApplicationContextInitializers have been called but before any bean definitions are loaded.
在上下文准备完成之后,加载bean definitions之前发送此事件。
SpringBoot#ApplicationPreparedEvent
An
ApplicationPreparedEventis sent just before the refresh is started but after bean definitions have been loaded.
在上下文准备完成且加载bean definitions完成之后,刷新上下文之前发送此事件。
SpringBoot#ApplicationStartedEvent
An
ApplicationStartedEventis sent after the context has been refreshed but before any application and command-line runners have been called.
在上下文刷新完成之后,调用ApplicationRunner和CommandLineRunner之前发送此事件。
SpringBoot#AvailabilityChangeEvent
An
AvailabilityChangeEventis sent right after withLivenessState.CORRECTto indicate that the application is considered as live.
在Runner调用完毕后立即发送,表示当前应用已处于活动状态:LivenessState.CORRECT。
SpringBoot#ApplicationReadyEvent
An
ApplicationReadyEventis sent after any application and command-line runners have been called.
在Runner调用完毕后发送,表示应用已经准备完毕。
SpringBoot#AvailabilityChangeEvent
An
AvailabilityChangeEventis sent right after withReadinessState.ACCEPTING_TRAFFICto indicate that the application is ready to service requests.
应用准备完毕后,还会发送一次此事件,表示当前应用已经可以接收请求了:ReadinessState.ACCEPTING_TRAFFIC。
SpringBoot#ApplicationFailedEvent
An
ApplicationFailedEventis sent if there is an exception on startup.
启动过程中出现异常时,会发送此事件。
从源码来看
在梳理完上面的这些事件后,其实基本上对Spring和SpringBoot启动流程中一些重要的节点有了初步的印象。那现在就直接从源码来看,会更加清晰。
AbstractApplicationContext#refresh
Spring启动刷新上下文的核心方法,都很熟悉。步骤分明,注释清晰,优雅的代码:
public void refresh() throws BeansException, IllegalStateException {
    synchronized (this.startupShutdownMonitor) {
        StartupStep contextRefresh = this.applicationStartup.start("spring.context.refresh");

        // Prepare this context for refreshing.
        // 记录刷新开始时间、初始化PropertySources、记录刷新之前注册的监听器(如果有)
        prepareRefresh();

        // Tell the subclass to refresh the internal bean factory.
        // 获取实例化的BeanFactory。默认的实现是 DefaultListableBeanFactory
        ConfigurableListableBeanFactory beanFactory = obtainFreshBeanFactory();

        // Prepare the bean factory for use in this context.
        // 向BeanFactory中填充属性/配置/组件等等
        // 如ClassLoader、某些post-processors、bean的表达式解析器(StandardBeanExpressionResolver)、environment beans
        prepareBeanFactory(beanFactory);

        try {
            // Allows post-processing of the bean factory in context subclasses.
            // BeanFactory初始化完成后,执行一些固定的后置处理。
            // 这里用最常见的Web应用来说明:
            // Web应用在此处会向BeanFactory中添加一些Servlet相关类的依赖解析,以便于处理它们的自动注入。
            // 因为像ServletRequest和HttpSession是动态变化的,并不是单例bean,这里Spring是利用ObjectFactory来实现的
            // 也就是说实际上注入的ServletRequest是一个对象工厂,每次取HttpServletRequest时是调用的此ObjectFactory来从请求上下文取值
            postProcessBeanFactory(beanFactory);

            StartupStep beanPostProcess = this.applicationStartup.start("spring.context.beans.post-process");
            // Invoke factory processors registered as beans in the context.
            // 执行为BeanFactory准备的后置处理器
            invokeBeanFactoryPostProcessors(beanFactory);

            // Register bean processors that intercept bean creation.
            // 注册为bean准备的后置处理器
            registerBeanPostProcessors(beanFactory);
            beanPostProcess.end();

            // Initialize message source for this context.
            // 初始化MessageSource,国际化的标准实现就是利用MessageSource,还有就是像javax Validation的自定义消息也可以用它实现
            initMessageSource();

            // Initialize event multicaster for this context.
            // 初始化事件多播器,默认SimpleApplicationEventMulticaster
            initApplicationEventMulticaster();

            // Initialize other special beans in specific context subclasses.
            // 默认空,子类重写,初始化子context独有的类
            // SpringBoot中的ServletWebServerApplicationContext就会重写它,用来初始化内置的Tomcat或其它WebServer
            onRefresh();

            // Check for listener beans and register them.
            // 把事件监听器注册到EventMulticaster中去,且在此时会发布在EventMulticaster初始化之前的事件
            registerListeners();

            // Instantiate all remaining (non-lazy-init) singletons.
            // 主要是初始化我们通常所说的单例bean
            finishBeanFactoryInitialization(beanFactory);

            // Last step: publish corresponding event.
            // 最后结束的时候发布了ContextRefreshedEvent事件
            finishRefresh();
        }
        catch (BeansException ex) {
            if (logger.isWarnEnabled()) {
                logger.warn("Exception encountered during context initialization - " +
                            "cancelling refresh attempt: " + ex);
            }

            // Destroy already created singletons to avoid dangling resources.
            // 销毁单例bean,移除内存中的单例bean并回调bean的`destroy()`方法
            destroyBeans();

            // Reset 'active' flag.
            cancelRefresh(ex);

            // Propagate exception to caller.
            throw ex;
        }
        finally {
            // Reset common introspection caches in Spring's core, since we
            // might not ever need metadata for singleton beans anymore...
            resetCommonCaches();
            contextRefresh.end();
        }
    }
}
...
protected void finishRefresh() {
    // Clear context-level resource caches (such as ASM metadata from scanning).
    clearResourceCaches();

    // Initialize lifecycle processor for this context.
    initLifecycleProcessor();

    // Propagate refresh to lifecycle processor first.
    // 在初始化上面的LifecycleProcessor后,走的逻辑跟显式调用`start`方法的逻辑一样。当然start的bean就不一定一样了,且不会发布任何事件
    getLifecycleProcessor().onRefresh();

    // Publish the final event.
    publishEvent(new ContextRefreshedEvent(this));
}
AbstractApplicationContext#start
显式调用的start()和stop()方法,可以看到会发布ContextStartedEvent和ContextStoppedEvent:
@Override
public void start() {
    getLifecycleProcessor().start();
    publishEvent(new ContextStartedEvent(this));
}

@Override
public void stop() {
    getLifecycleProcessor().stop();
    publishEvent(new ContextStoppedEvent(this));
}
SpringApplication#run
SpringBoot的应用启动核心流程如下:
public ConfigurableApplicationContext run(String... args) {
    long startTime = System.nanoTime();
    // 创建一个BootstrapContext:引导上下文,在ApplicationContext真正刷新完成前可用
    DefaultBootstrapContext bootstrapContext = createBootstrapContext();
    ConfigurableApplicationContext context = null;
    // 声明当前应用使用headless模式:表示应用处于服务器模式下,无法调用外接设备,如显示器、鼠标等,主要是针对awt的使用场景。
   	// SpringBoot当然默认是非交互式、非可视化的服务器应用
    configureHeadlessProperty();
    // 注册SpringApplicationRunListener
    // 加载应用本身的监听器(主要是EventPublishingRunListener,生命周期相关的事件由它来发布)
    // 以及一些扩展的hookListener,用于自定义监听某些启动阶段
    SpringApplicationRunListeners listeners = getRunListeners(args);

    // 发布 ApplicationStartingEvent
    listeners.starting(bootstrapContext, this.mainApplicationClass);

    try {
        ApplicationArguments applicationArguments = new DefaultApplicationArguments(args);

        // environment的加载准备,会发布 ApplicationEnvironmentPreparedEvent
        ConfigurableEnvironment environment = prepareEnvironment(listeners, bootstrapContext, applicationArguments);

        // 打印banner信息
        Banner printedBanner = printBanner(environment);
        // 根据当前应用类型(Servlet、Reactive)创建一个 ConfigurableApplicationContext
        context = createApplicationContext();
        context.setApplicationStartup(this.applicationStartup);

        // 刷新应用上下文前的准备工作:
        // 1.注册environment(避免重复加载)、应用上下文的后置处理、执行应用上下文刷新前的initializer
        // 2.发布 ApplicationContextInitializedEvent
        // 3.关闭BootstrapContext:这里会发布一个BootstrapContextClosedEvent,监听它能拿到BootstrapContext和ApplicationContext。如果需要做一些bean的迁移可以在此处实现
        // 4.向BeanFactory中添加一些配置属性,往ApplicationContext中添加一些BeanFactory的后置处理
        // 5.核心步骤,加载BeanDefinition
        // 6.加载完毕后,发布 ApplicationPreparedEvent
        prepareContext(bootstrapContext, context, environment, listeners, applicationArguments, printedBanner);

        // 调用Spring的`AbstractApplicationContext#refresh()`方法,刷新上下文
        refreshContext(context);
        // 默认空实现,预留的钩子
        afterRefresh(context, applicationArguments);
        Duration timeTakenToStartup = Duration.ofNanos(System.nanoTime() - startTime);
        if (this.logStartupInfo) {
            new StartupInfoLogger(this.mainApplicationClass).logStarted(getApplicationLog(), timeTakenToStartup);
        }

        // 发布 ApplicationStartedEvent和AvailabilityChangeEvent(LivenessState.CORRECT)
        listeners.started(context, timeTakenToStartup);
        // 调用ApplicationRunner和CommandLineRunner的实现
        // 譬如seata-server的启动就是一个SpringBoot应用,实现了CommandLineRunner来触发调用Server.start
        callRunners(context, applicationArguments);
    }
    catch (Throwable ex) {
        if (ex instanceof AbandonedRunException) {
            throw ex;
        }
        // 失败后会发布 ApplicationFailedEvent
        handleRunFailure(context, ex, listeners);
        throw new IllegalStateException(ex);
    }
    try {
        if (context.isRunning()) {
            Duration timeTakenToReady = Duration.ofNanos(System.nanoTime() - startTime);
            // 发布 AvailabilityChangeEvent(ReadinessState.ACCEPTING_TRAFFIC)
            listeners.ready(context, timeTakenToReady);
        }
    }
    catch (Throwable ex) {
        if (ex instanceof AbandonedRunException) {
            throw ex;
        }
        // 失败后会发布 ApplicationFailedEvent
        handleRunFailure(context, ex, null);
        throw new IllegalStateException(ex);
    }
    return context;
}

...

private DefaultBootstrapContext createBootstrapContext() {
    // SpringBoot中的另一个IOC容器,在刷新应用容器之前,可以通过它来创建一些组件实例,通过BootstrapRegistryInitializer接口来实现
    // 譬如说SpringCloud的ConfigServer会在此时注册一些组件
    DefaultBootstrapContext bootstrapContext = new DefaultBootstrapContext();
    this.bootstrapRegistryInitializers.forEach((initializer) -> initializer.initialize(bootstrapContext));
    return bootstrapContext;
}
小结
在整理完事件顺序和阅读完源码之后,Spring及SpringBoot的启动流程就一目了然了。流程的各个关键阶段都发布了对应的事件来方便做监听和扩展。而且在梳理整个流程的过程中,也会发现一些其它很优秀、很巧妙的设计,比如:
- 钩子函数:如AbstractApplicationContext#onRefresh、SpringApplication#afterRefresh
- 对象工厂:ObjectFactory替代实际的单例bean,再真正需要的时候从工厂灵活获取真实的bean对象
- BeanPostProcessor:后置处理器接口,Spring实现AOP的经典设计
- PropertySource:应用的键值配置都转换成了这个抽象类。还可以基于它做自定义组件的属性源,如NacosPropertySource
- SpEL:强大的Spring表达式语言。之前也基于它实现过一个操作日志组件
除了Spring和SpringBoot本身之外,在SpringCloud以及各家大厂的不同版本中,也有一些常见事件,比如SpringCloud#RefreshEvent、SpringCloud#EnvironmentChangeEvent、SpringCloud#RefreshScopeRefreshedEvent,在使用SpringCloud标准的@RefreshScope实现远程配置动态刷新时相关的几个事件。